table of contents
- Heading 1
- Heading 1
- Heading 1
share this
The industrial robotics market share is expected to reach $49.25 billion by 2030. It is predicted that programmers of robots will make a fortune out of this. Despite initial intimidation, especially in robotic welding programming, mastering this field can be very rewarding. With the right approach and tools, one can tap into these lucrative prospects.
This guide will walk you through the basics, highlight key parameters to understand, and explore the benefits of delving deeper into vision-guided automation.
How to Get Started With Robotic Welding Programming
Starting with robotic welding programming can seem daunting due to various challenges. Understanding these challenges and learning how to address them through specific steps will set you up for success. Let’s start with the challenges you may face:
1. Complexity of Setup
Implementing and establishing a robotic welding system requires proper fixing and adjustments. Correct positioning of the robot and the welding equipment is important to produce quality welds. The initial setup may seem challenging. However, a well-organized foundation for the strategy can create sustainability in the long run.
2. Learning Curve
One of the most significant hurdles faced by a novice is understanding the programming languages and interfaces. There are several programming environments, and different robots may use different programming environments. These environments may be based on various commands and procedures. The learning curve involved can slow progress in the initial implementation. But it is critical to get to know the system completely.
3. Consistency and Repeatability
It is challenging to produce high-quality welds on various parts if the program is done poorly. The position of the parts, the environment, and the wearing out of equipment can all affect the welds. To ensure repeatability, there must be clear documentation in the programming and constant calibration to stay precise.
4. Maintenance and Troubleshooting
Routine checks and immediate rectification are crucial in maintaining the proper functioning of the robotic welding system. These include periodic removal of dirt deposits and replacement of worn-out components. By addressing all mishaps you can avoid bottlenecks and maintain a technical run. However, maintenance involves a sequence of activities that can be tiresome and demanding to be handled by technicians.
5. Safety Concerns
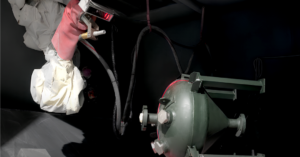
Robot welding process involves heat, electricity, and potentially harmful gasses, which pose safety risks to operators. Measures like shields, adequate air circulation, and accidental stoppage of supply among others can provide a safer environment for these operations. Awareness-creating programs are also mandatory to prepare the operators to handle robotic systems and work around them safely.
Overcoming these challenges requires proper training, adequate planning, and the right steps to ensure successful robotic welding programming. Let’s understand these steps in detail.
Steps to Get Started With Robotic Welding Programming
It is easy to be overwhelmed by robot welding programming. But you can simplify the process by breaking it down into smaller steps:
1. Understand the basics
Don’t dive head-first into programming. Your first step should be to understand the basic principles of welding and robotics. Familiarize yourself with welding techniques such as TIG, MIG, and arc welding. Understand how robots are used in these applications. Concepts such as control systems, dynamics, and programming languages will provide a solid foundation.
2. Get the right training
Robot manufacturers offer training programs to master their robots. Enrolling in these programs is highly beneficial, as they cover specific programming techniques, how to use the robot interface, and best practices for maintenance and troubleshooting. You can know the ins and outs of your specific machine when you attend training from the manufacturer. This makes the transition to automated welding easier and efficient.
3. Set up your workspace
A neat, clean, and safe work environment is critical. Ensure your welding area is free of clutter and hazards. Provide adequate ventilation for smoke control and install impact barriers to protect operators from welding pressure and robot contact. Organize your office so that you have easy access to all the tools and supplies needed to run the business smoothly.
4. Calibrate your equipment
Calibration ensures precision in your welding operations. Accurately calibrate the robot, welding torch, and power source. For high-quality welds, the parameters must be set correctly, the robot motion must complement the welding process, and all equipment must operate within tolerances.
5. Start with simple programs
Starting with small programs will help you understand the capabilities and limitations of the robot and yourself. Start with simple tasks like linear welds. Experiment with different parameters and learn how they affect weld quality. And then gradually move to more complex tasks as you gain confidence.
6. Test and Refine
Perform basic operations on test items to detect potential problems. Testing allows you to observe how the robot performs in real-world situations. Monitor weld quality and make necessary modifications. Adjust parameter settings as needed to improve performance. Experimentation and refinement are ongoing processes that help you achieve the best results.
7. Document Everything
Maintain detailed records of everything you do, including your plans, procedures, and changes. There will be times you wish you had a report with you. It can be invaluable for solving problems, maintaining consistency, and training new employees. Record the specifics of each weld procedure, including parameters such as speed, angle, and number of passes. This information will help recreate successful programs and avoid repeated errors.
These steps will help you establish a strong foundation in welding robot programming. This method not only simplifies the learning process but also ensures that you get a consistent, high-quality weld.
4 Things to Take Note When Programming Welding Robots
There are specific system parameters you need to focus on to achieve top-notch weld quality. Here are four important considerations while programming welding robots:
1. Angle of attack
The angle at which the welding torch approaches the joint is important. For example, in a filet weld, the angle determines the exact amount of heat applied to the joint. A poor angle can cause poor heat distribution, resulting in a poor or incomplete weld. Proper placement of the face allows the weld to penetrate and blend well into the joint, creating a stronger and more durable bond.
2. Workpiece Offset
There is an offset between the welding torch and the work surface. This is critical to achieve proper weld penetration and bead size. Too much offset can cause poor weld material that doesn’t penetrate properly, and too little can cause excessive wetting and uneven welding. By properly adjusting the offset, you can achieve a consistent weld bead that meets the required strength and aesthetics.
3. Number of passes
The number of passes refers to the weld metal used at the joint. Elevated approaches generally result in strong welds, which are important for joints that carry high loads or stresses. Too many passes, however, will increase the risk of error and prolong the welding process. Balancing the number of passes provides adequate efficiency without loss of performance. Each pass must be carefully planned to ensure proper fusion and avoid defects such as porosity or inclusions.
4. Speed
The speed of the robot during welding affects the overall heat generation and welding quality. Fast speeds can cause insufficient heating, resulting in poor fusion and poor weld quality. And slower speeds can generate overheating, which can lead to work jamming or failure. Finding the optimal speed ensures that the weld penetrates properly without thermal damage to the product. This balance is key to producing high-quality and reliable welds.
By paying attention to these details, you improve the reliability of your welds and the overall productivity of your welding operations.
Essential Robotic Welding Tools
The right tools in place are essential to get high-quality welds and efficient workmanship. Here are 3 essential tools for successful robotic welding.
Welding Torch
The welding torch is used for applying heat to the joint. Its design and maintenance are critical for consistent operation. The torch alignment tools ensure that the lighting is positioned correctly relative to the work. Cleaning and inspecting the lamp regularly is crucial for maintaining proper gas flow. When choosing the right torch for your specific welding application consider factors like material type and size to improve your weld outcome. Additionally, ensure the torch mount is compatible with the robot’s dimensions. Another thing to note is to keep the end effector with robot arm in a comfortable position to reduce issues of reachability and singularity.
Power Source
Choose a power source that is compatible with your welding robot and specific welding system. Make sure the power source doesn’t fluctuate and is capable of meeting the demands of your welding project. Adjust the voltage and current settings to suit the material and desired weld facets. Advanced processes such as pulse welding can improve weld quality by controlling heat input and reducing distortion.
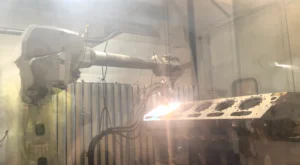
Welding Robot
Welding robots execute the scheduled welding jobs. Constant calibration of the robot provides accuracy and precision in its movements. Using an easy-to-use programming interface like Augmentus can help you efficiently create and adjust welding procedures. A robot, when properly prepared, can produce a consistently good quality weld with minimal human intervention. So, remember to follow routine maintenance habits like checking for damage and ensuring that all components are working properly. This is necessary to prevent downtime and maintain proper operation.
Note: Some welding robots, like FANUC’s Arc Mate series, feature a hollow wrist design where the welding cables and hoses run through the robot’s body. This design prevents cables and hoses from getting snagged during welding and avoids chances for downtime.
How to Automate A Welding Process
Following a documented procedure in the robotic welding process provides consistency and reduces confusion. It’s here step by step to help you with that:
1. Assess Your Needs
First, determine the specific requirements of your welding application. What products do you use, what integration processes are in place, and how many are produced? Understanding these will help you choose the right tools and robotic welding programming software. Different materials and joints may require specific welding techniques and parameters. So get a clear picture of your needs.
2. Select the Right Equipment
Choose the right welding robot, power source, and peripherals to match your business requirements. Make sure all components can work together without discrepancies. It’s always highly recommended to get robots with hollow wrist configuration to minimize the headache of cable breakages. The equipment must be capable of handling the welding operation intended. So, carefully select welding torches that can accommodate the required angles and offsets, along with adequate power source and control features.
3. Program the Robot
Create a detailed welding plan. This must include all important parameters, such as angle, speed, and number of passes. Modern robotic welding programming software offers user-friendly features that make it easy to create and change programs. Make sure your program covers all aspects of the welding process, including starting and stopping, welding techniques, and necessary stops or adjustments
4. Set Up the Workspace
Set up a welding room to accommodate the robots and make sure it is safe. It must have adequate space for the robots to move, adequate ventilation, and safety fences to protect the operators. The work area should be organized so that tools and equipment are easily accessible. All this allows the operation to flow without any interruptions.
5. Calibrate the System
Set up in advance to line up the robot welding torch, and workpiece. This step helps to avoid problems with misalignment. When you set up, pay attention to things like finding the robot’s home position checking that all movements are correct, and picking the right torch for the job. You need to check the setup often to keep your welds top-notch.
6. Perform Dry Runs
Perform dry runs to check the program and fix anything that needs fixing. Testing helps you spot possible issues and fix them before you start real production. To make your program work better, run the robot motion without welding turned on. If you find undesirable outcomes, modify the program accordingly. After successful dry runs, proceed with production runs with the welding activated to ensure the path and weld quality are correct.
7. Monitor and Optimize
Always monitor the welding process and adjust it on the spot. Utilize data from the robot’s feedback systems, such as sensors, to work to improve precision in outcomes. While monitoring, look for any changes in weld quality and fix them right away. Regular inspection and maintenance can make sure your automated welding setup stays productive and churns out top-notch welds all the time.
Augmentus Scan to Weld Robotics
Augmentus’ Scan to Weld Robotics provides an advanced and efficient solution for automated welding processes. These key benefits can redefine the way you program your welding robots:
3D Scanning Technology
The system utilizes sophisticated 3D scanning to capture detailed images of the workpiece. This allows for the precise creation of welding paths. With this technology, you can adapt to complex geometries and shapes without much effort. This reduces the need for manual adjustments and increases the accuracy of the welding process.The system utilizes sophisticated 3D scanning to capture detailed images of the workpiece. This allows for the precise creation of welding paths. With this technology, you can adapt to complex geometries and shapes without much effort. This reduces the need for manual adjustments and increases the accuracy of the welding process.
Intuitive User Interface
One of the standout features of Augmentus’ solution is its user-friendly interface. The system is designed to be accessible even to those with minimal technical expertise. Users can easily set up and manage welding operations through a straightforward, interactive interface. This streamlines the programming process and reduces training time.
Enhanced Productivity
By automating the welding path creation and minimizing setup times, the Scan to Weld Robotics system significantly boosts productivity. This technology not only speeds up the welding process but also ensures high-quality, consistent welds. This makes Augmentus a valuable asset for manufacturers looking to enhance their production capabilities.
Conclusion
Mastering welding robot programming can be challenging. But these days, with advanced technological solutions like Augmentus, it’s not as daunting as it used to be. Without such tools, robot programming is likely to become a tedious task, potentially inefficient and finding the right talent can be strenuous. Augmentus has only made programming more manageable and accurate. To learn more about offline robot programming software, visit our website now.