table of contents
- Heading 1
- Heading 1
- Heading 1
share this
Spraying gelcoat is a crucial step in maintaining and enhancing the appearance of a boat. As boating technology advances, the demand for high-quality finishes has never been higher. To achieve superior finishes, one needs to have the right preparation and tools and follow specific procedures.
Be it restoring an older vessel or adding final touches to a new one, accurate gelcoat application is essential. So how to spray gelcoat on a boat? This guide will take you through the essential steps, necessary equipment, and safety precautions for better execution and results.
Preparation for Spraying Gelcoat
To get the best results when spraying a gelcoat, it’s important to set things ready. Prepare the boat’s surface thoroughly and gather all required equipment. This also includes safety measures to prioritize quality without compromising on safety.
Surface Preparation
Proper surface preparation allows the gelcoat to adhere perfectly. Start by cleaning the boat’s surface with acetone to remove any dirt, grease, or wax. Sand the surface with sandpaper to create a rough texture, which helps the gelcoat bond effectively. Strip down the surface to bare fiberglass or polyester resin. This is important as the gelcoat adheres best to these materials. After sanding, clean the surface again with acetone to remove any sanding dust or debris.
Equipment Needed for Spraying Gelcoat
Having the right equipment is essential for achieving a smooth and even gelcoat application. Here are what you’ll need:
- Spray Gun: Designed for thick materials like gelcoat.
- Air Compressor: Must maintain consistent pressure.
- Gelcoat Thickness Gauge: To monitor application thickness.
- Mixing Containers: For preparing the gelcoat with catalyst.
- Stir Sticks: For thorough mixing.
- Personal Protective Equipment (PPE):
- Gloves
- Safety goggles
- Respirator
Depending on the specific requirements of your project, you might also need additives like wax or surfacing agents to enhance the finish.
Safety Precautions
Working with gelcoats involves handling potentially hazardous chemicals. So, safety becomes paramount. The following precautions will help provide a safe and effective gelcoat application process:
- Work in a Well-Ventilated Area: Proper airflow is crucial to avoid inhaling harmful fumes during the application process.
- Wear Personal Protective Equipment (PPE): Always use gloves, safety goggles, and a respirator to protect your skin, eyes, and lungs from exposure to toxic chemicals.
- Avoid Direct Sunlight: Spraying gelcoat in direct sunlight can cause the material to cure too quickly. This can lead to uneven application and potential defects.
- Protect Surrounding Areas: Use drop cloths or plastic sheeting. This prevents overspray and the potential damage it can cause to other parts of the boat or surrounding objects.
- Keep Acetone Handy: Acetone is essential for cleaning tools and addressing spills immediately before the gelcoat hardens and becomes difficult to remove.
Step-by-Step Guide to Spraying Gelcoat on a Boat
The choice between manual application and using an automated robotic system depends on the scale of the project, the precision demands, and available resources. Knowing the steps involved in both methods is essential. Let’s discuss them individually, starting with manual application:
1. Spraying Gelcoat on a Boat Manually
The manual application of gelcoat is a detailed and hands-on process. It requires attention to each step to ensure a high-quality finish.
Mix the Gelcoat:
Start by mixing the gelcoat with the correct amount of catalyst. This is typically around 1.5% to 2% by volume and is instructed by the manufacturer. It is necessary to mix uniformly to prevent uneven curing.
Prepare the Spray Gun:
Pour the mixed gelcoat into the spray gun’s reservoir, using a fine mesh filter to remove any lumps or impurities. Set the air pressure to around 30-50 PSI, depending on the spray gun specifications.
Apply the Tack Coat:
Begin spraying a light coat by holding the spray gun about 12 inches from the boat’s surface. A thin, even coat of this tack coat makes subsequent layers adhere better.
Build Up Layers:
Allow the tack coat to become tacky (usually within 15-20 minutes), then apply additional coats. Each layer should be about 5 mils thick. Typically, 4-5 layers are needed to reach the desired thickness of 20-25 mils. Use smooth, overlapping strokes to avoid streaks or missed spots.
Monitor Thickness:
Use a gelcoat thickness gauge between coats for a consistent build-up. This prevents issues like uneven application or excessive thickness, which can lead to cracking.
Curing:
After the final coat, allow the gelcoat to cure fully. This can take several hours depending on the temperature and humidity. Avoid disturbing the surface during this time to prevent any imperfections.
Following these steps carefully will help you achieve a smooth, durable finish when manually applying a gelcoat to your boat.
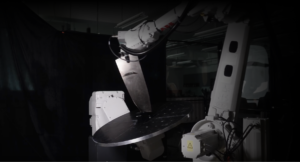
Spraying Gelcoat on a Boat With An Automated Robotic Spraying Solution
Automating the gelcoat spraying process with robotic systems brings precision, consistency, and efficiency. This makes it ideal for large-scale projects or when a flawless finish is needed. Here are the steps:
Program the Robot:
Begin by programming the robotic system to follow the specific contours of the boat. This involves setting the spray pattern, speed, and pressure based on the surface texture and desired thickness of the gelcoat.
Set Up the Equipment:
Ensure that the spray gun attached to the robot is properly calibrated for gelcoat application.
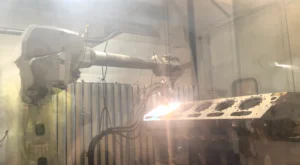
Apply the Gelcoat:
The robot will automatically apply the gelcoat evenly across the surface based on the programmed path. The system can make fine adjustments to ensure that each layer is applied uniformly without any error.
Monitor the Application:
Throughout the process, monitor the robot’s performance and make any necessary adjustments to the program or equipment settings. By doing this, even complex curves are properly coated with the gelcoat.
Layering:
In a single pass, the robot can apply multiple layers of gelcoat, reducing application time. The application principle is similar to the manual process. A typical application involves 4-5 layers, with each layer being about 5 mils thick.
Final Inspection and Curing:
Once the application is complete, check for even coverage and that the desired thickness has been achieved. Allow the gelcoat to cure fully, just as you would in a manual application.
Post-Application Adjustments:
After curing, the robot can be used to perform any necessary finishing touches, such as sanding or polishing, to achieve the perfect finish.
Automated robotic spraying solutions reduce material waste, minimize labor costs, and deliver a high-quality finish. These standards are crucial to meet the needs of marine applications. Though the initial setup cost of automation is higher, the long-term benefits and faster project completion often supersede the investment.
So now that you know how to spray gelcoat, let’s move on to the next stage of the process.
After the application of gelcoat, the post-spraying process is crucial to achieving a smooth, durable finish. Let’s explore this in detail.
Post-spraying Process
By carefully following the below steps, you can improve the longevity and appearance of your boat.
Curing:
Once the final coat of gelcoat has been applied, allow it to cure fully. Curing times can vary depending on the type of gelcoat used and environmental conditions. Usually, it requires 24 hours at the least. Avoid surface disturbed during this period for better finish.
Sanding:
After curing, the surface may have some rough spots or an orange peel texture. Wet sanding the surface with fine-grit sandpaper will smooth out these imperfections. Wet sanding also helps to prepare the surface for polishing by creating a uniform texture.
Polishing:
Polishing uses a buffing compound to bring out the shine in the gelcoat. Apply the compound to a polishing pad and work it into the surface in small, circular motions. Buffing not only enhances the appearance but also helps seal the surface. This makes it more resistant to environmental factors.
Waxing:
Finally, apply high-quality marine wax to protect the gelcoat from UV rays, salt, and other elements. This protective layer helps maintain the finish and prolongs the lifespan of the gelcoat. Regular waxing is recommended to keep the surface in optimal condition.
Manual vs. Automated Gelcoat Spraying
When it comes to spraying gelcoat, you have two main options: doing it manually or using automated systems. The manual method offers flexibility and is generally more accessible for small-scale projects or repairs. With it, intricate works can be handled in confined spaces with greater control.
However, manual spraying requires skill and experience to achieve a consistent, professional finish. It is also more time-consuming and labor-intensive, which can be a drawback for larger surfaces or multiple layers. Additionally, manual spraying exposes workers to toxic fumes during the gelcoating process, further increasing health risks and the need for extensive safety precautions.
Automation, on the other hand, helps with precision and efficiency, especially for large-scale projects. Robotic systems can apply gelcoats with uniform thickness and consistency taking the likelihood of human error out of the equation.
Automation also speeds up the process and helps with quicker project completion, better safety, and reduction in labor costs. While robotic systems can initially cost a lot of money, the long-term benefits in terms of reduced material waste, improved quality, and higher productivity often justify the price. For large or complex projects where consistency and speed are critical, automated spraying is the superior choice.
Automate Gelcoat Spraying: Augmentus Robotic Programming Solutions
Augmentus offers advanced robotic programming solutions that bring precision, efficiency, and consistency to your gelcoat spraying process. Augmentus is not your conventional robot system. It specializes in developing user-friendly robotic systems to automate complex spraying processes.
Here are some benefits of using Augmentus’s Scan to Spray robotic solutions:
Ease of Use:
Augmentus robotic systems are equipped with intuitive programming interfaces. The setup and operation are straightforward, which makes it easier even for users with limited experience in robotics. The software allows for quick adjustments to spray patterns, speeds, and thicknesses, ensuring that each project can be tailored to specific requirements.
Precision and Adaptability:
Augmentus Vision 3D scans parts with high precision, effortlessly handling the intricate surfaces and curves of a boat. The platform allows you to create a master program in just 15 minutes, ready for immediate use on the production floor. For subsequent parts, Augmentus Vision references this master program to accurately compensate for any deviations, demonstrating the adaptability of the solution.
Efficiency and Cost Savings:
While the initial setup costs for an automated gelcoat spraying process may be slightly higher, the efficiency gains are substantial. Augmentus not only improves finish quality but also reduces material waste and labor costs. With Augmentus, projects can be programmed 30 times faster, significantly boosting productivity and throughput. These advantages lead to a return on investment (ROI) in less than six months, allowing you to quickly realize profits.
Conclusion
We’ve discussed all about how to spray gelcoat on a boat. Spraying gelcoat requires precision and careful execution. Both manual and automated methods have their strengths, and choosing the right approach depends on your project’s scale and complexity. Ultimately, investing in the right tools and techniques will help you attain high-quality results. This at the end of the day enhances the longevity and appearance of your boat.
Book a demo now and speak to an automation expert to know more about how we can help you.
FAQs
1. Can I spray gelcoat over old gelcoat?
Yes, you can spray gelcoat over old gelcoat, but the surface must be properly cleaned, sanded, and prepared to ensure good adhesion.
2. How do I get a smooth finish on gelcoat?
To achieve a smooth finish, apply multiple thin layers, wet sand between layers, and finish with buffing and polishing.
3. Is it better to spray or brush gelcoat?
Spraying is generally better for a smooth, even finish, while brushing can be used for small areas or touch-ups.
4. Do you have to thin gelcoat to spray it?
Yes, gelcoat often needs to be thinned with a compatible thinner to achieve the proper consistency for spraying.
5. What is the optimal spraying environment for gelcoat?
The optimal environment is between 60-80°F with low humidity and minimal direct sunlight to prevent uneven curing.
6. What are the common mistakes to avoid when spraying gelcoat?
Avoid spraying too thickly, not sanding properly between coats, and neglecting to clean the surface before application.
7. How long does it take for gelcoat to cure?
Gelcoat typically takes 24-48 hours to cure fully, depending on the temperature, humidity, and thickness of the application.